Bulk actions
Once you have at least one account ticked, the Actions button (blue, with a count badge) appears in the toolbar. Clicking Actions ▾ opens a menu of eight operations applied to all selected accounts. With nothing ticked, the whole button is hidden.
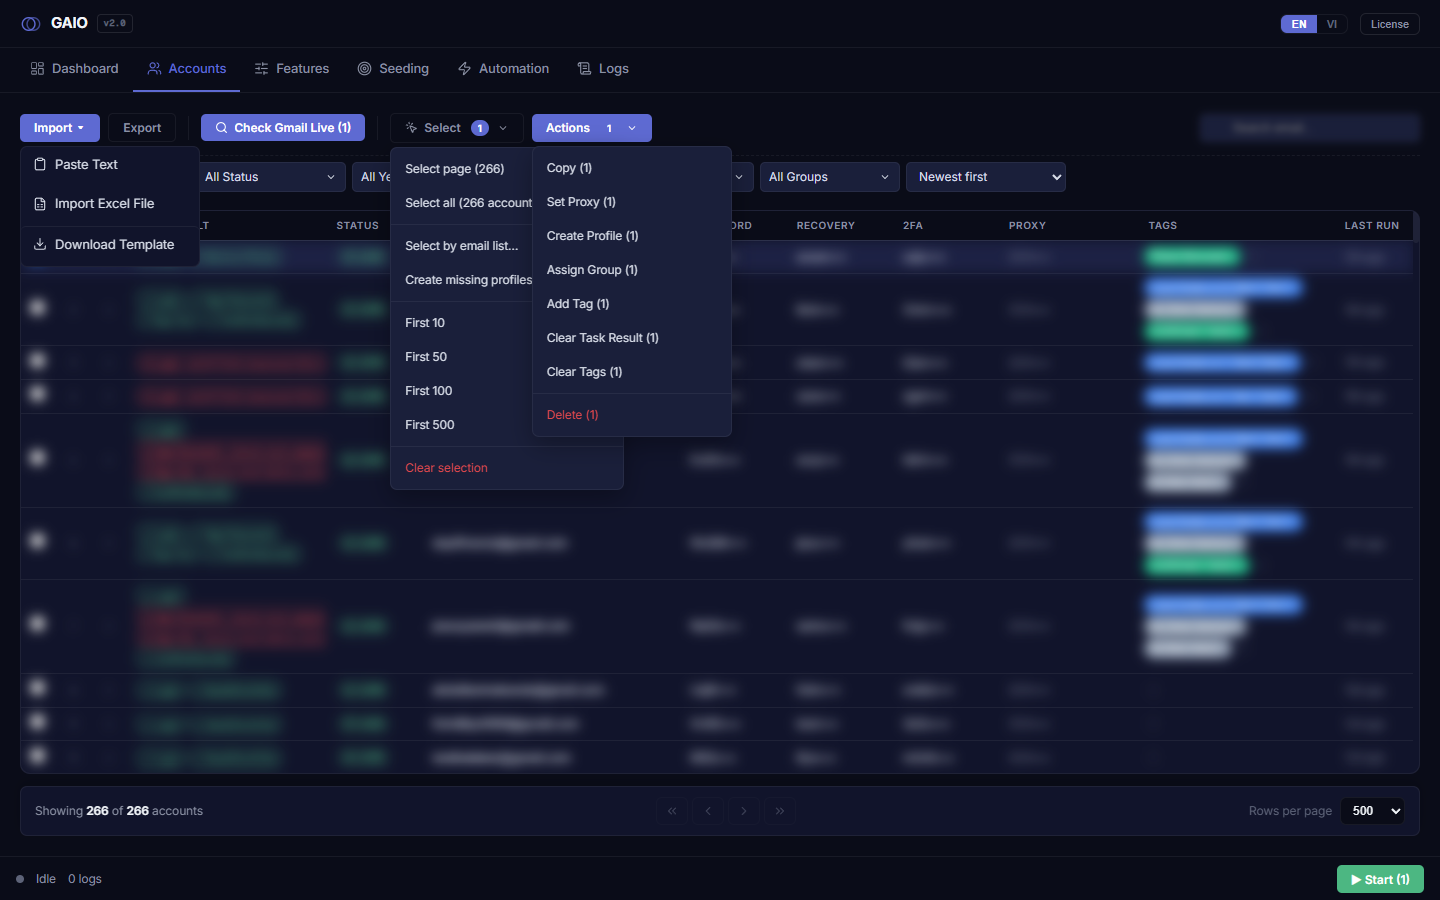
The eight actions in the menu
| Action | What it does |
|---|---|
Copy (N) | Copies the selected accounts to the clipboard as |-separated lines. |
Set Proxy (N) | Opens the Set Proxy modal to edit/assign proxies (detailed below). |
Create Profile (N) | Bulk-creates GPMLogin antidetect profiles for the selected accounts. |
Assign Group (N) | Opens the assign/remove/create-group modal. |
Add Tag (N) | Opens the add-tag modal (with colour) to tag all selected accounts. |
Clear Task Result (N) | Wipes the Task Result column of the selected accounts (resets their last-run status). |
Clear Tags (N) | Removes ALL tags from the selected accounts. |
Delete (N) | Permanently deletes the selected accounts (red, destructive item). |
Copy (N)
- Tick accounts, then
Actions ▾→Copy (N). - Paste anywhere — one account per line in field order:
email | password | recovery_email | 2FA_secret | app_password | proxy. A toast confirms✓ Copied N accounts.
Trailing empty fields are trimmed off each line. Copy fetches the full database, so a selection spanning many pages copies correctly, not just the visible page.
Set Proxy (N) — the Set Proxy modal
This is a proxy editor that works both per-row and in bulk for the selected accounts. The modal has two parts: a per-row table on top and a bulk paste box below.
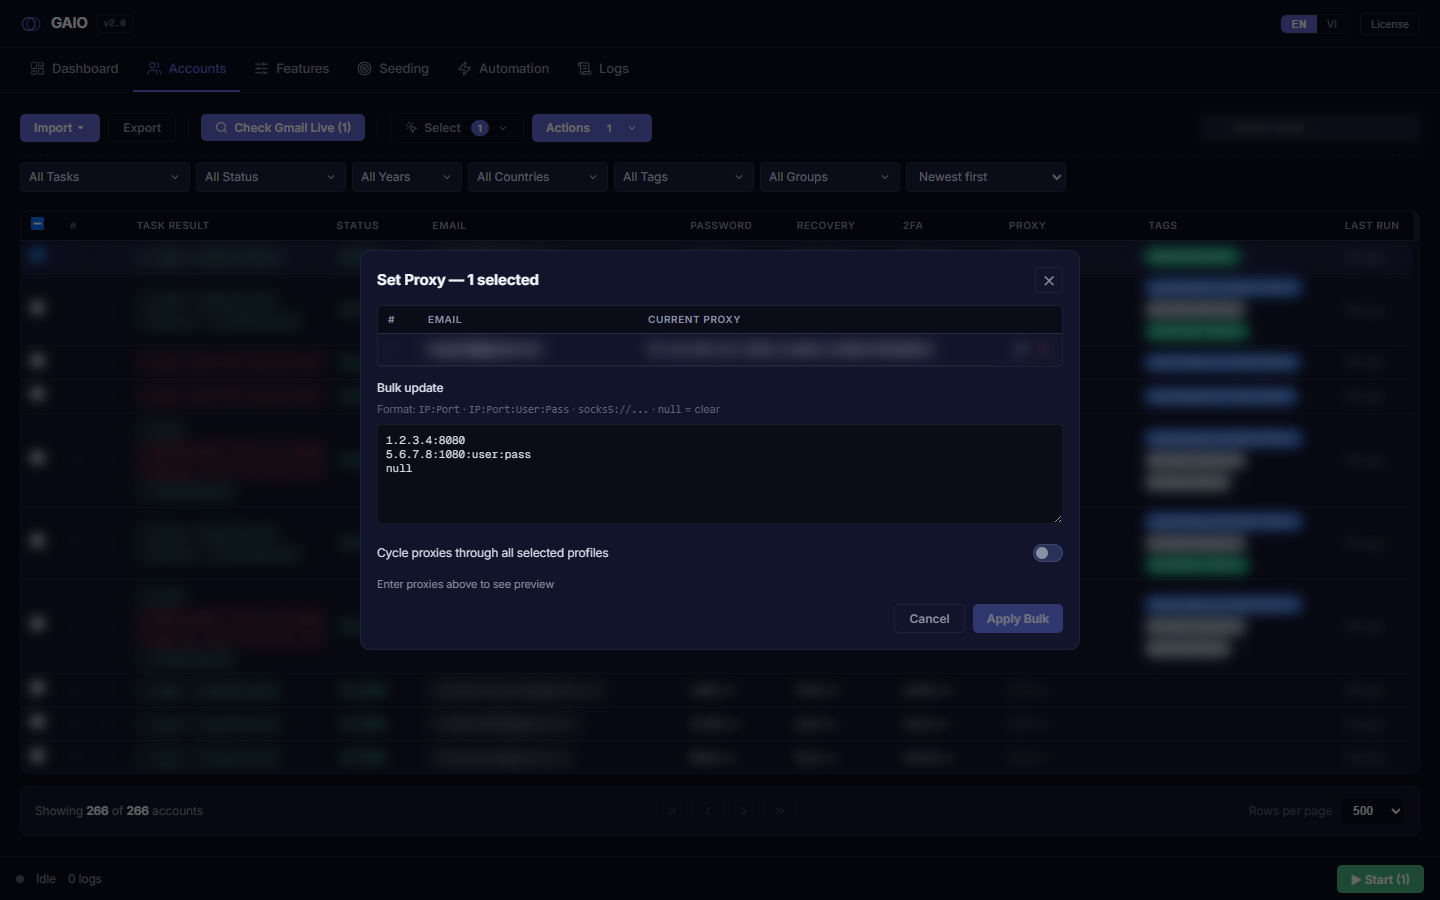
Editing per row
- Click the pencil icon on a row to edit that account's proxy inline —
Enteror clicking away saves,Escapecancels. - Click
✕to clear that account's proxy (disabled if it's already empty or the profile is running).
Per-row edits save instantly and independently of the
Apply Bulk button — nothing else to press.Bulk assignment
- Paste proxies into the bottom box — one per line. Accepted forms:
IP:Port(e.g.1.2.3.4:8080),IP:Port:User:Pass,socks5://…, or the wordnullto clear. - Toggle
Cycle proxies through all selected profiles— see the table below. - Read the preview line (it reports how many will be assigned and how many skipped), then click
Apply Bulk.
| Cycle toggle | How proxies are distributed |
|---|---|
| ON | Cycles the proxy list across every eligible account — best when you have FEWER proxies than accounts. |
| OFF (1-to-1) | Assigns one proxy to one account in order. Extra proxies are ignored; if there are too few, the remaining accounts keep their current proxy. |
Only lines containing a
: (or the word null) count as a valid proxy. Apply Bulk is disabled unless there is ≥1 valid proxy line and ≥1 eligible account.Accounts currently running automation are skipped. They show at 50% opacity with an orange dot ●, their pencil/✕ buttons are disabled, and the preview says
N running profiles skipped. The modal loads the account list once when opened and does not re-fetch — if run states change, close and reopen it.Create Profile (N)
- Tick accounts, then
Actions ▾→Create Profile (N). - Read the confirmation (it explains the fingerprint settings that will be used), then confirm.
- Wait — the item shows
Creating...; a toast reports created / skipped / failed counts.
Each profile gets a random fingerprint (browser version + screen + OS), all masking + noise enabled, WebRTC based on IP, plus the account's own proxy. Existing profiles are skipped.
The confirmation is an in-app dialog, so it always shows on the installed build. Profiles are ready to run right after this — there is no need to open them by hand in the antidetect app; the old open-once requirement is gone. If one fails to start, check its proxy first.
Assign Group (N)
Assign the selected accounts to a group, remove them from one, or create a new group. It also lets you rename and delete groups.
- Tick accounts, then
Actions ▾→Assign Group (N). - Click an existing group name to assign the selection to it, or
— (Remove from group)to unassign. - To make a new one: type a name under
Or create new groupand clickCreate + Assign— the group is created and the current selection assigned immediately. - Click
✎to rename a group, or✕to delete it.
Deleting a group asks for confirmation and warns that its N accounts will be removed from the group — but the accounts themselves are NOT deleted. Rename uses an in-app input dialog. After assigning, the selection is cleared and a toast confirms.
Add Tag (N)
Adds one coloured tag to all selected accounts, with a colour palette and a preview chip.
- Tick accounts, then
Actions ▾→Add Tag (N). - Type a tag name (or click a suggested existing tag — up to 12 buttons prefill the name).
- Pick a colour from the 8 preset swatches (default indigo
#6366f1, plus blue/green/amber/red/violet/pink/slate) or the custom colour input. - Check the preview chip, then click
Add Tag (N).
The
Add Tag button is disabled until you type a name. The same tag is added to every selected account; a toast reports how many were tagged.Clear Task Result (N) & Clear Tags (N)
Clear Task Result (N)— wipes the Task Result column. It asks to confirmXoá Task Result của N accounts?("Clear Task Result of N accounts?"). A toast reports how many were cleared.Clear Tags (N)— removes every tag (not a specific one). It asks to confirmXoá tất cả tags của N accounts?("Clear all tags of N accounts?").
Delete (N)
Delete (N) permanently deletes the accounts from the database — this cannot be undone. Always re-check the count N and your filters before confirming, so you don't wipe a whole batch after accidentally using Select all filtered.- Tick the accounts to remove.
Actions ▾→ redDelete (N).- Confirm
Delete N account(s)?— after deletion the selection is cleared and the table refreshes.